
How to Screenshot on Chromebook: Easy Guide
Taking a screenshot might seem like a small thing, but once you know how to do it properly, it becomes one of the most useful skills on any device. Whether you’re saving study notes, capturing an error message, or sharing something interesting, knowing how to take a Screenshot on Chromebook makes your digital life much easier.
Chromebooks are designed to be simple, fast, and user-friendly, but many beginners still get confused about keyboard shortcuts and hidden tools. The good news is that once you understand the basics, taking a Screenshot on Chromebook becomes second nature.
Let’s break everything down in a clear, practical way so you can start capturing your screen like a pro.
What Is a Screenshot on Chromebook?
A Screenshot on Chromebook is simply an image capture of whatever is currently displayed on your screen. It can include the entire screen, a selected area, or even just a single window.
Common Uses of Screenshots
- Saving online receipts
- Capturing class notes
- Reporting technical issues
- Sharing conversations or images
- Recording information for later use
The Screenshot on Chromebook feature is built into Chrome OS, so you don’t need any extra software.
Why Learning Screenshot on Chromebook Matters
You might think screenshots are basic, but they actually save time and improve productivity.
Benefits of Taking Screenshots
- Quick information saving
- Easy communication
- No need for manual note-taking
- Helpful for troubleshooting
- Useful for students and professionals
Once you master Screenshot on Chromebook methods, you’ll use them almost daily.
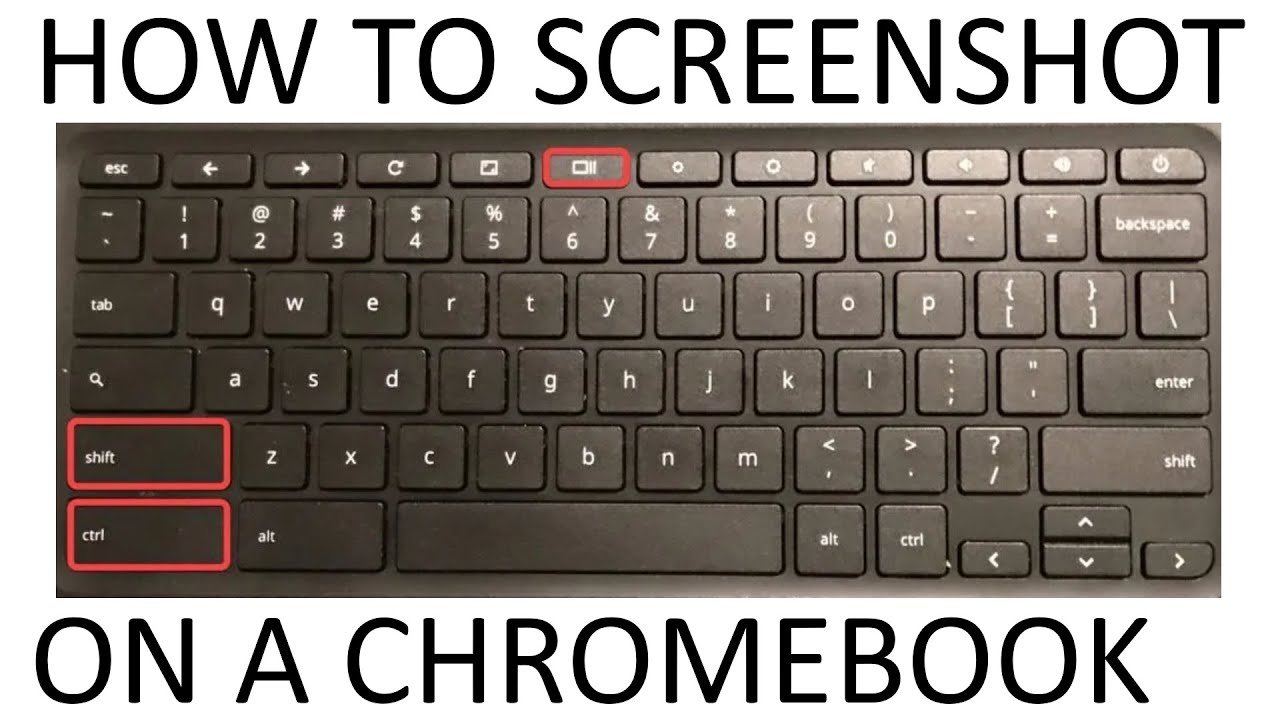
Method 1: Full Screen Screenshot on Chromebook
The simplest way to take a Screenshot on Chromebook is to capture the entire screen.
Keyboard Shortcut
Press:
- Ctrl + Show Windows key (rectangle with lines)
This instantly captures your full screen.
Where to Find It
After taking the Screenshot on Chromebook:
- It is saved automatically in the Downloads folder
- You can also access it via the Files app
- A notification appears in the corner
This method is perfect for capturing everything visible on your screen.
Method 2: Partial Screenshot on Chromebook
Sometimes you don’t need the whole screen—just a part of it.
Steps for Partial Capture
- Press Ctrl + Shift + Show Windows key
- Drag your cursor to select the area
- Release to capture
This Screenshot on Chromebook method is great for precision.
Best Use Cases
- Cropping images
- Capturing quotes
- Selecting specific data
- Highlighting content
Method 3: Window Screenshot on Chromebook
If you only want a specific window, this method is ideal.
How to Do It
- Press Ctrl + Alt + Show Windows key
- Select the window you want
- Capture instantly
This type of Screenshot on Chromebook keeps things clean and focused.
Method 4: Using the Quick Settings Menu
Chromebooks also allow screenshots through the on-screen menu.
Steps
- Click the time in the bottom-right corner
- Open Quick Settings
- Select Screen Capture
- Choose screenshot type
This method is beginner-friendly and does not require memorizing shortcuts.
Method 5: Tablet Mode Screenshot on Chromebook
If you are using a touchscreen Chromebook, the process is slightly different.
Touch Gesture Method
- Press Power + Volume Down together
- Screen flashes to confirm capture
This is especially useful for 2-in-1 Chromebook devices.
Where Screenshots Are Saved
After taking a Screenshot on Chromebook, many users wonder where it goes.
Default Location
- Downloads folder
- Files app under “Images”
- Recent notifications panel
You can also move or edit screenshots easily.
Editing Your Screenshot on Chromebook
Once you take a Screenshot on Chromebook, you may want to edit it.
Built-in Editing Tools
- Crop tool
- Rotate option
- Brightness adjustment
- Annotation tools
These basic tools are enough for quick edits.
Keyboard Shortcuts Cheat Sheet
Here’s a quick reference table for Screenshot on Chromebook shortcuts:
| Action | Shortcut |
|---|---|
| Full screen screenshot | Ctrl + Show Windows |
| Partial screenshot | Ctrl + Shift + Show Windows |
| Window screenshot | Ctrl + Alt + Show Windows |
| Tablet screenshot | Power + Volume Down |
Common Problems and Fixes
Sometimes users struggle with Screenshot on Chromebook due to simple issues.
Common Issues
- Shortcut not working
- File not saving
- Wrong screen captured
- Touchscreen confusion
Easy Fixes
- Restart device
- Check keyboard layout
- Update Chrome OS
- Try Quick Settings method
Tips for Better Screenshots
If you want cleaner and more useful screenshots, follow these tips:
Pro Tips
- Close unnecessary tabs
- Adjust brightness before capture
- Use partial screenshot for focus
- Organize files after saving
- Rename important images
These habits improve how you use Screenshot on Chromebook.
When to Use Each Screenshot Method
Not all methods are equal. Choosing the right one matters.
Best Use Guide
- Full screen → tutorials or pages
- Partial → highlights or specific info
- Window → apps or tools
- Tablet mode → mobile-style use
Understanding this makes Screenshot on Chromebook more efficient.
Advanced Chromebook Screenshot Uses
Once you master the basics, screenshots can become part of productivity workflows.
Advanced Uses
- Creating study guides
- Saving design references
- Reporting bugs with visuals
- Sharing instructions
- Documenting online activity
The Screenshot on Chromebook tool is more powerful than it looks.
Chromebook Screenshot vs Other Devices
Chromebooks have a simpler system compared to Windows or Mac.
Comparison Highlights
- Fewer steps required
- Built-in tools only
- No external software needed
- Faster execution
- Cloud-friendly storage
This makes Screenshot on Chromebook ideal for beginners.
Why Chromebooks Make Screenshots Easy
The Chrome OS system is designed for simplicity.
Key Reasons
- Minimal keyboard shortcuts
- Built-in capture tool
- Instant saving system
- Easy file access
- User-friendly design
That’s why Screenshot on Chromebook is so widely appreciated.
Final Thoughts
Learning how to take a Screenshot on Chromebook is one of the easiest but most useful skills you can master on the device. Whether you’re a student, professional, or casual user, screenshots help you save time, communicate better, and stay organized.
From full-screen captures to precise selections, Chromebook offers multiple ways to take screenshots without installing any extra tools. Once you practice a few times, it becomes completely automatic.
If you’ve just learned how to use Screenshot on Chromebook, try experimenting with different methods to see which one fits your daily routine best. And if you found this guide helpful, it’s always worth sharing with someone who’s still figuring it out.


Leave a Reply