
How to Screen Record on Mac with Sound
If you’ve ever tried to capture a tutorial, record a meeting, or save gameplay on your Mac, you’ve probably noticed one frustrating thing: getting both screen and sound right isn’t always obvious. That’s exactly why learning how to properly screen record on Mac is so useful.
The good news is that macOS already includes powerful built-in tools. You don’t need expensive software or complicated setups. You just need to understand the right settings and steps.
In this guide, we’ll break everything down in a natural, simple way so you can confidently screen record on Mac with both internal and external sound.
Why Screen Recording on Mac Is So Useful
Before jumping into the steps, it helps to understand why people want to screen record on Mac in the first place.
Common reasons include:
- Creating online tutorials
- Recording Zoom or online meetings
- Saving video calls or webinars
- Capturing gameplay footage
- Making software demonstrations
- Recording presentations
- Saving streaming content for personal use
In short, screen recording has become part of everyday digital work and learning.
Built-in Tools to Screen Record on Mac
Apple provides built-in options that make it easy to screen record on Mac without installing anything.
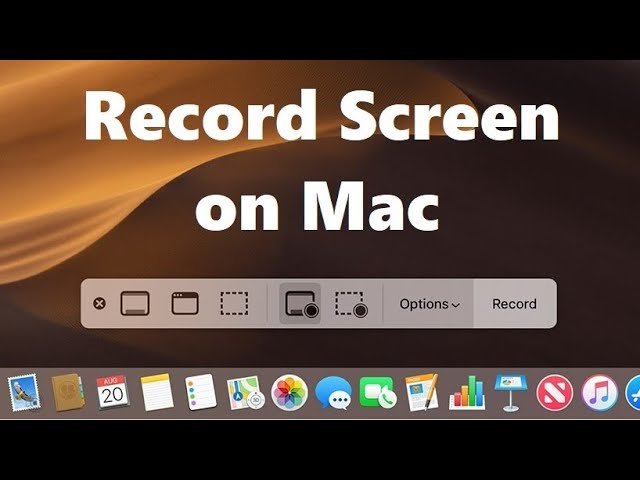
The main tool is the macOS Screenshot Toolbar, which includes screen recording features.
You can access it quickly using a shortcut:
- Press Shift + Command + 5
This opens a control panel where you can choose recording options.
How to Screen Record on Mac Step-by-Step
Let’s go through the simplest method to screen record on Mac using built-in tools.
Step 1: Open the Screen Recording Toolbar
Press:
Shift + Command + 5
You will see options like:
- Record entire screen
- Record selected portion
- Take screenshots
- Recording settings
Step 2: Choose Your Recording Area
You can:
- Record full screen
- Select a specific area
- Capture a single app window
Step 3: Select Audio Settings
This is the most important part if you want sound.
To screen record on Mac with audio:
- Click Options
- Choose microphone input
- Select internal or external mic
However, macOS does not always record system audio by default, which leads us to the next section.
How to Screen Record on Mac with Sound
Many users struggle here. The default tool can record microphone audio, but internal system sound requires extra setup.
To properly screen record on Mac with sound, you need to understand two types of audio:
1. Microphone Audio
This captures:
- Your voice
- External sound
- Background commentary
2. System Audio
This includes:
- Video playback sound
- Game audio
- App sounds
- Music or streaming audio
Methods to Screen Record on Mac with Sound
Method 1: Using Built-in Microphone
This is the easiest way to screen record on Mac with sound.
Steps:
- Open Shift + Command + 5
- Click Options
- Select Built-in Microphone
- Start recording
This captures your voice but not internal system audio.
Method 2: Using Audio Routing Software
To fully screen record on Mac with system sound, users often rely on audio routing tools.
These tools help redirect internal audio into the recording.
Common use cases:
- Recording YouTube audio
- Capturing gameplay sound
- Saving webinar audio
Best Settings for High-Quality Screen Recording
To get the best results when you screen record on Mac, follow these settings:
Video Settings
- Full screen resolution
- High frame rate
- Clean desktop setup
- Close unnecessary apps
Audio Settings
- Clear microphone input
- External mic for better quality
- Balanced system volume
Performance Tips
- Free up RAM
- Close background apps
- Use SSD storage for saving files
Keyboard Shortcuts for Screen Recording
If you want to quickly screen record on Mac, these shortcuts help:
- Shift + Command + 5 → Open recording tools
- Command + Control + Esc → Stop recording
- Space bar → Pause (depending on setup)
Where Screen Recordings Are Saved
After you screen record on Mac, files are usually saved automatically to:
- Desktop
- Movies folder
- Or custom location (if changed in settings)
File format is typically:
- .mov (QuickTime format)
Common Problems and Fixes
No Sound in Recording
If your screen record on Mac has no audio:
- Check microphone selection
- Adjust system sound settings
- Ensure permissions are enabled
Laggy Video
Fix by:
- Closing heavy apps
- Reducing screen resolution
- Restarting Mac
Recording Not Starting
Try:
- Updating macOS
- Resetting system permissions
- Checking storage space
Best Uses for Screen Recording on Mac
You can screen record on Mac for many practical purposes:
- Online teaching
- Remote work presentations
- YouTube content creation
- Software tutorials
- Bug reporting
- Social media content
Final Thoughts
Learning how to properly screen record on Mac is one of those skills that becomes surprisingly useful in everyday life. Whether you’re a student, creator, or professional, it saves time and makes communication easier.
While Apple provides built-in tools, getting sound right is what makes the difference between a basic recording and a professional one.
Once you understand the settings and workflow, you can easily screen record on Mac for almost any purpose—from tutorials to meetings to content creation.
In the end, mastering how to screen record on Mac with sound gives you a simple but powerful digital skill that you’ll use again and again.


Leave a Reply