
Taking a Screenshot on a Chromebook Is Easier Than You Think
The first time someone hands you a Chromebook, it feels simple, clean, and fast. Then you try to do one basic thing, like capture your screen, and suddenly you wonder, “Where is the Print Screen key?” That moment is more common than you might think.
Unlike many Windows laptops, most Chromebooks do not have a traditional Print Screen button. That can make taking a Screenshot on a Chromebook feel confusing at first. But the good news is this: once you learn the right shortcuts, it becomes one of the easiest things to do.
Maybe you want to save an online receipt, capture a funny chat, grab part of a webpage, report an error message, save a school assignment, or share something with a coworker. Whatever the reason, knowing how to take a Screenshot on a Chromebook can save time and make your work smoother.
In this guide, I’ll walk you through five easy ways to take a Screenshot on a Chromebook. I’ll also explain where your screenshots go, how to edit them, how to copy them, and what to do if the shortcut does not work. No complicated tech talk. Just clear steps that anyone can follow.
What Is a Screenshot on a Chromebook?
A screenshot is simply a picture of what appears on your screen. When you take a Screenshot on a Chromebook, your device captures the display and saves it as an image file.
You can capture:
- The full screen
- A selected part of the screen
- One specific window
- A webpage section
- A video call screen
- A document or online form
- An error message
- A Chromebook screen recording
This is useful for students, teachers, remote workers, business owners, bloggers, customer support teams, and everyday users. In fact, once you start using Chromebook screenshot tools, you may use them more often than expected.
Quick Shortcut Table for Chromebook Screenshots
| Screenshot Type | Chromebook Shortcut | Best For |
|---|---|---|
| Full screen screenshot | Ctrl + Show Windows | Capturing everything on screen |
| Partial screenshot | Ctrl + Shift + Show Windows | Selecting a specific area |
| Screenshot menu | Shift + Ctrl + Show Windows | Opening capture options |
| Tablet mode screenshot | Power + Volume Down | Touchscreen Chromebooks |
| Window screenshot | Screenshot toolbar option | Capturing one app window |
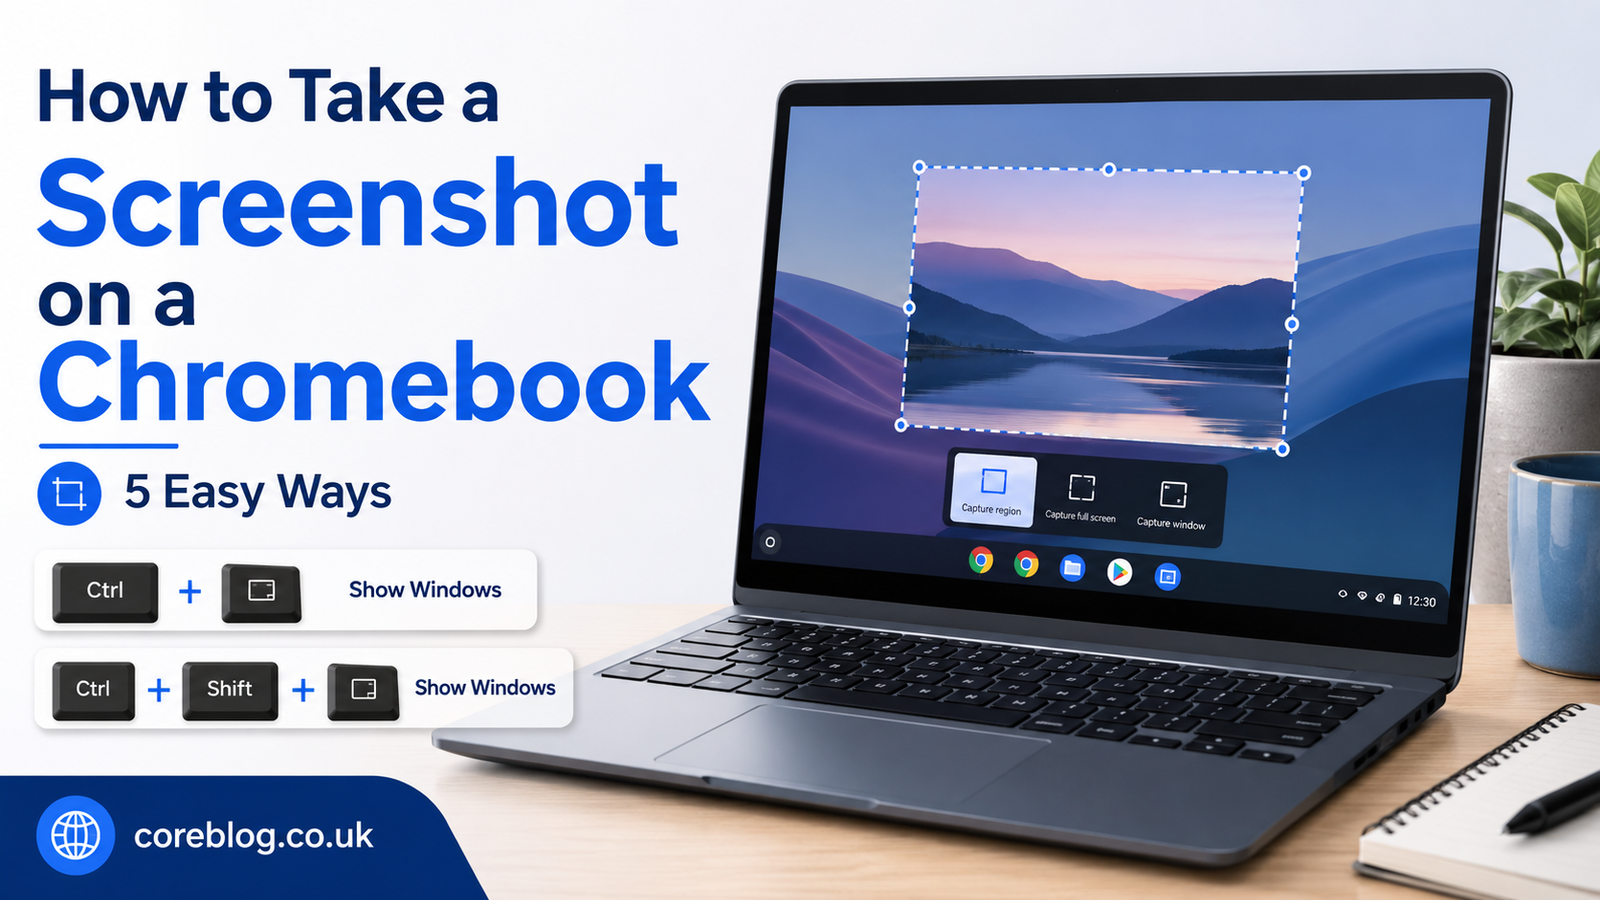
The Show Windows key usually looks like a rectangle with two vertical lines next to it. It is often located on the top row of the keyboard, where the F5 key would be on a normal keyboard.
1: Take a Full Screenshot on a Chromebook
The easiest way to take a Screenshot on a Chromebook is by capturing the full screen. This method saves everything currently visible on your display.
How to Take a Full Screenshot
Follow these simple steps:
- Open the screen you want to capture.
- Press Ctrl + Show Windows at the same time.
- Wait for the screenshot preview to appear.
- Click the preview if you want to edit or view it.
- Find the saved screenshot in your Downloads folder.
That’s it. Your Chromebook will instantly save a full-screen image.
When Should You Use a Full Screenshot?
A full Screenshot on a Chromebook is best when you want to capture everything at once. For example, it works well for:
- Saving a complete browser screen
- Capturing a dashboard
- Sharing a classroom screen
- Saving a full app view
- Reporting a system error
- Showing your desktop layout
However, if your screen contains private details, such as email addresses, passwords, open tabs, or personal messages, you may want to use a partial screenshot instead. That way, you only capture what matters.
2: Take a Partial Screenshot on a Chromebook
Sometimes, you do not need the whole screen. Maybe you only want one paragraph, one image, one form field, or one section of a webpage. This is where the partial Screenshot on a Chromebook option becomes very useful.
How to Take a Partial Screenshot
Here’s how to capture only part of your screen:
- Press Ctrl + Shift + Show Windows.
- Your screen will dim slightly.
- Click and drag your cursor over the area you want to capture.
- Release the mouse or trackpad.
- Your Chromebook will save the selected area as an image.
This method gives you more control. It also helps keep your screenshot clean and focused.
Why Partial Screenshots Are Better for Sharing
A partial Screenshot on a Chromebook is often better when you are sending something to another person. It removes distractions and protects your privacy.
For example, instead of sending your entire browser window, you can capture only:
- A single comment
- A payment confirmation
- A product image
- A small chart
- A section of Google Docs
- A highlighted mistake
- A school question
- A form error
In my opinion, this is the screenshot method most Chromebook users should learn first. It looks cleaner, feels more professional, and saves time later because you do not need to crop the image.
3: Use the Built-In Screenshot Tool
ChromeOS includes a built-in screenshot toolbar. This tool is great because it gives you multiple screen capture options in one place.
How to Open the Screenshot Toolbar
To open the screenshot toolbar, press:
Shift + Ctrl + Show Windows
Once the toolbar appears, you can choose between screenshot and screen recording options. You can capture the full screen, a selected area, or a specific window.
Screenshot Toolbar Options
The Chromebook screen capture tool usually offers these choices:
- Full screen capture
- Partial screen capture
- Window capture
- Screen recording
- Microphone option for recordings
- Save location settings
This makes it easier to manage your screenshot workflow, especially if you take screenshots often.
Why the Screenshot Toolbar Is Useful
The screenshot toolbar is helpful because you do not have to memorize every shortcut. It is also ideal for beginners who prefer visual controls.
For example, if you are helping a parent, student, or new Chromebook user, the toolbar is easier to explain than keyboard combinations. Once they open it, they can see the capture options clearly.
This is also the best method if you want to switch between taking a Screenshot on a Chromebook and recording your screen.
4: Take a Screenshot on a Chromebook in Tablet Mode
Some Chromebooks work like tablets. These models have touchscreens and can fold or detach from the keyboard. If your keyboard is not available, you can still take a Screenshot on a Chromebook using physical buttons.
How to Screenshot in Tablet Mode
Press:
Power button + Volume Down button
This works much like taking a screenshot on a phone or tablet. The screen will flash or show a small preview, and the image will be saved automatically.
Best Uses for Tablet Mode Screenshots
Tablet mode screenshots are useful when you are:
- Reading an ebook
- Browsing with touch controls
- Using a drawing app
- Watching a lesson
- Taking notes
- Viewing a PDF
- Using your Chromebook as a tablet
This method is quick, but it captures the full screen. If you need only a small section, switch back to the keyboard or use the screenshot toolbar if available.
5: Capture One Window on a Chromebook
There are times when you only want to capture one app window, not the full screen and not a custom area. For example, you may want to capture only your Chrome browser window, a settings page, or a document window.
How to Capture a Window
Use the screenshot toolbar:
- Press Shift + Ctrl + Show Windows.
- Select the window capture option.
- Click the window you want to capture.
- Your Chromebook will save that window as a screenshot.
This is a neat option because it keeps your screenshot tidy. It removes other apps, background tabs, and desktop clutter.
When Window Capture Works Best
A window Screenshot on a Chromebook is best for:
- App tutorials
- Software guides
- Website reviews
- Online classes
- Work presentations
- Tech support
- Client instructions
If you run a blog or create tutorials, this method can make your images look much more polished.
Where Do Screenshots Go on a Chromebook?
After you take a Screenshot on a Chromebook, the file is usually saved in the Downloads folder. You may also see a small preview pop up in the corner of the screen.
To find your screenshot:
- Open the Files app.
- Click Downloads.
- Look for a file with “Screenshot” in the name.
- Open, rename, move, or share it as needed.
On newer Chromebooks, you may also be able to choose where screenshots are saved from the screen capture toolbar settings. This is helpful if you want screenshots to go directly into a specific folder.
How to Copy a Screenshot Instead of Saving It
Sometimes you do not want to save a screenshot file. You just want to paste it into an email, chat, Google Docs file, or message.
After taking a Screenshot on a Chromebook, look for the small preview notification. You may see a copy option. Click it, then paste the screenshot where you need it using:
Ctrl + V
This is very handy when you are working fast. For example, you can take a screenshot of an error message and paste it straight into a support chat.
How to Edit a Screenshot on a Chromebook
Once your screenshot is saved, you may want to crop it, mark something, or adjust it before sharing.
Basic Editing Options
Open the screenshot from the Files app or preview window. Depending on your Chromebook version, you may be able to:
- Crop the image
- Rotate it
- Rename it
- Add simple marks
- Adjust the image
- Share it directly
- Open it in another app
For more detailed edits, you can use Google Photos, a drawing app, or an online image editor. But for most basic needs, Chromebook’s built-in tools are enough.
Editing Tips for Better Screenshots
A Screenshot on a Chromebook looks better when it is clean and focused. Before sharing, try these quick tips:
- Crop unnecessary blank space
- Hide private information
- Rename the file clearly
- Use arrows or highlights only when needed
- Keep the image sharp
- Avoid capturing too many open tabs
- Close private windows before taking the screenshot
Small details make a big difference, especially if you are sending screenshots for work or publishing them online.
How to Take a Screen Recording on a Chromebook
While this article is mainly about how to take a Screenshot on a Chromebook, it is worth mentioning screen recording too. Sometimes a still image is not enough. You may need to show movement, steps, or a problem happening in real time.
How to Record Your Screen
To record your Chromebook screen:
- Press Shift + Ctrl + Show Windows.
- Choose the screen recording option.
- Select full screen, partial screen, or window recording.
- Click to start recording.
- Stop the recording when finished.
- Find the video file in your saved location.
Screen recording is useful for tutorials, online lessons, app demos, bug reports, and remote work explanations.
Common Problems When Taking Screenshots on a Chromebook
Most of the time, taking a Screenshot on a Chromebook works smoothly. However, a few small issues can happen.
The Shortcut Is Not Working
If your Chromebook screenshot shortcut does not work, try these fixes:
- Make sure you are pressing the correct Show Windows key.
- Restart your Chromebook.
- Check if your keyboard is working properly.
- Try the screenshot toolbar instead.
- Update ChromeOS if an update is available.
- Use the on-screen keyboard if needed.
Sometimes users confuse the Show Windows key with another top-row key. Look for the key that looks like a rectangle with lines beside it.
The Screenshot Is Not Saving
If your Screenshot on a Chromebook does not appear in Downloads, check these things:
- Open the Files app and search “Screenshot.”
- Check your recent files.
- Look at the screen capture save location.
- Make sure your storage is not full.
- Restart your device and try again.
If your Chromebook storage is almost full, screenshots may fail to save properly. Deleting old files or moving them to Google Drive can help.
The Screenshot Looks Blurry
A screenshot usually captures the screen exactly as it appears. If it looks blurry, the original content may have been low quality, zoomed out, or compressed after sharing.
To avoid blurry screenshots:
- Keep the screen zoom at a readable size
- Capture only the needed area
- Avoid sending through apps that compress images heavily
- Use the original saved file when possible
- Do not enlarge a small screenshot too much
Best Tips for Taking Better Screenshots on a Chromebook
A good screenshot is not just about pressing the right keys. It is also about making the image useful.
Clean Your Screen Before Capturing
Before you take a Screenshot on a Chromebook, close anything you do not want others to see. This includes private tabs, personal messages, bookmarks, email previews, and account details.
It only takes a few seconds, but it protects your privacy.
Use Partial Capture for Professional Results
Full screenshots are fine, but partial screenshots often look better. They help the viewer focus on the important part.
For example, if you are explaining one button on a website, do not capture the whole page. Capture only that section. It feels cleaner and more direct.
Rename Your Screenshots
Chromebooks save screenshots with automatic names. That is fine at first, but after a while, your Downloads folder can become messy.
Rename files with simple names like:
- login-error-screenshot
- payment-confirmation
- math-homework-question
- website-header-example
- chromebook-settings-screen
This makes them easier to find later.
Move Important Screenshots to Google Drive
If a Screenshot on a Chromebook is important, do not leave it sitting in Downloads forever. Move it to Google Drive or another folder.
This is useful for:
- School work
- Office records
- Client projects
- Receipts
- Blog images
- Tutorials
- Support tickets
It also keeps your Chromebook storage cleaner.
Why Learning Chromebook Screenshots Matters
At first, screenshots seem like a small feature. But once you learn how to take a Screenshot on a Chromebook properly, it becomes part of your daily routine.
You can use screenshots to:
- Explain a problem faster
- Save important information
- Create tutorials
- Share visual proof
- Capture online receipts
- Help someone understand a step
- Keep records
- Improve communication
In many cases, a screenshot explains something better than a long message. Instead of typing five paragraphs, you can send one clear image.
Screenshot on a Chromebook for Students
Students can benefit a lot from Chromebook screenshot tools. Many schools use Chromebooks because they are simple, affordable, and connected to Google Classroom.
A student may take a Screenshot on a Chromebook to:
- Save assignment instructions
- Capture quiz feedback
- Share a technical issue with a teacher
- Save research notes
- Capture slides from an online lesson
- Keep track of project references
- Show homework progress
However, students should always follow school rules. Screenshots should not be used to cheat, copy private material, or share someone else’s work without permission.
Screenshot on a Chromebook for Work
For work, screenshots are even more useful. Remote teams often rely on visual communication. A clear Screenshot on a Chromebook can help explain an issue much faster than text alone.
You might use screenshots to:
- Report website bugs
- Show design changes
- Save meeting notes
- Explain software steps
- Share analytics screens
- Document payment records
- Create internal guides
- Help a client understand a process
If you work in digital marketing, customer support, web design, teaching, writing, or admin tasks, screenshots can become a daily tool.
Full Screenshot vs Partial Screenshot: Which Is Better?
Both options are useful, but they serve different needs.
| Screenshot Type | Best Use | Main Benefit |
| Full screenshot | Capturing everything visible | Fast and complete |
| Partial screenshot | Capturing a selected area | Clean and focused |
| Window screenshot | Capturing one app window | Professional and tidy |
| Tablet screenshot | Capturing without keyboard | Easy in touch mode |
| Screen recording | Showing movement or steps | Better for tutorials |
If you are not sure which one to use, choose partial screenshot. It gives you control and usually creates the most useful image.
Privacy Tips Before Sharing a Screenshot
Before you share any Screenshot on a Chromebook, pause for a moment. Screenshots can accidentally reveal more than you intended.
Check for:
- Email addresses
- Private messages
- Phone numbers
- Password fields
- Bank details
- Browser tabs
- Account names
- Location details
- Personal photos
- School or work information
If something private appears, crop it out or retake the screenshot. It is better to spend ten extra seconds than to share sensitive information by mistake.
Chromebook Screenshot Shortcuts Worth Remembering
If you only remember three shortcuts, remember these:
- Ctrl + Show Windows for a full screenshot
- Ctrl + Shift + Show Windows for a partial screenshot
- Shift + Ctrl + Show Windows for the screenshot toolbar
These three shortcuts cover almost everything most users need. Once they become familiar, taking a Screenshot on a Chromebook feels natural.
Frequently Asked Questions
Can I take a Screenshot on a Chromebook without a keyboard?
Yes. If your Chromebook is in tablet mode, press the Power button and Volume Down button together. This will capture the full screen.
Where are Chromebook screenshots saved?
Most screenshots are saved in the Downloads folder. You can open the Files app and check Downloads or recent files.
Can I change where screenshots are saved?
On many newer Chromebooks, you can open the screenshot toolbar and adjust the save location from the settings option.
Can I take a screenshot of only one window?
Yes. Open the screenshot toolbar with Shift + Ctrl + Show Windows, choose the window capture option, and click the window you want to capture.
Why does my Chromebook not have a Print Screen key?
Chromebooks use different keyboard shortcuts instead of a traditional Print Screen key. The Show Windows key replaces that function for screenshots.
Can I record my screen on a Chromebook?
Yes. Open the screen capture toolbar and choose the screen recording option. You can record the full screen, part of the screen, or a specific window.
Conclusion: Mastering Screenshots on a Chromebook Is Simple
Learning how to take a Screenshot on a Chromebook is one of those small skills that makes your device much easier to use. At first, the missing Print Screen key may feel confusing. But once you know the right shortcuts, everything becomes simple.
Use Ctrl + Show Windows for a full screenshot. Use Ctrl + Shift + Show Windows when you want to capture a selected area. Open the screenshot toolbar when you want more control, window capture, or screen recording. And if you are using tablet mode, the Power and Volume Down buttons will do the job.
The best part is that every method is quick, built in, and beginner-friendly. Whether you are a student, teacher, worker, blogger, or everyday user, knowing how to take a Screenshot on a Chromebook can help you save information, explain problems, and share ideas more clearly.
Now try taking your own screenshot and practice each method once. After that, it will feel natural. If this guide helped you, share it with someone who just got a Chromebook or leave a comment with your favorite screenshot shortcut.


Leave a Reply